2. ChilliSpot
This section deals with special configurations and usage of ChilliSpot.
2.1. Dynamic firewall with ChilliSpot and IP Tables
 | This setup is only possible with ChilliSpot version 1.1 |
2.1.1. Problem
See included schematic.
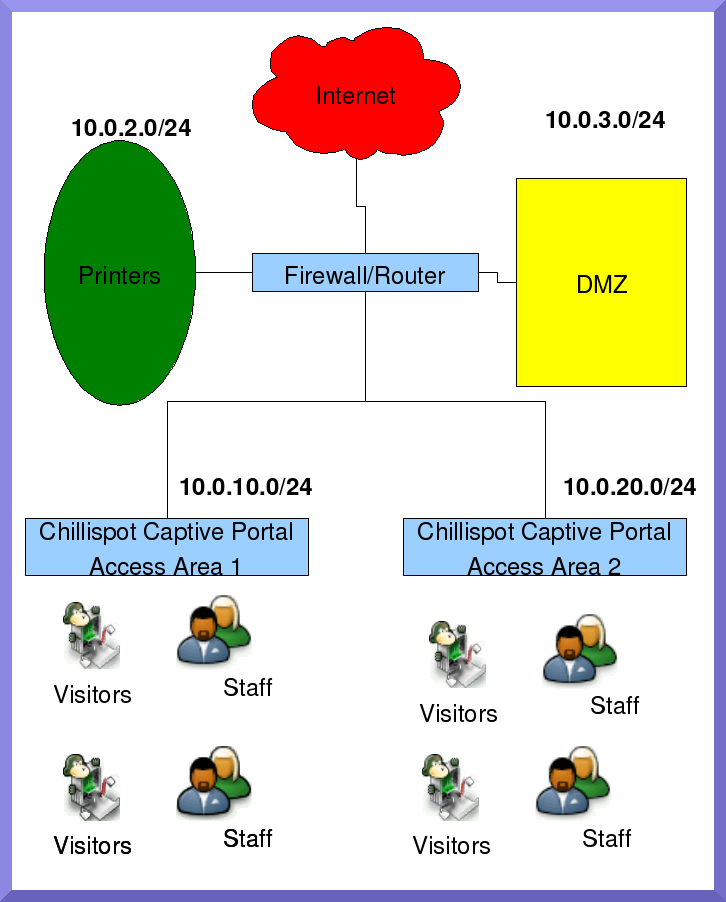
You have a mixed environment, there are visitors, and permanent staff. (A typical learning center.)
You want to control the places where a network user can go.
These places must change dynamically depending who is behind the computer accessing the network.
2.1.2. Solution
Implement a ChilliSpot Captive Portal which will act as a gatekeeper.
Take advantage of the "conup" and "condown" tags to dynamically add and remove IP Tables firewall rules when a user logs in and out of the network.
Make use of Hotcakes to manage the places users are allowed or not allowed to visit.
2.1.3. Discussion
The following is a brief discussion on the process of the dynamic firewall.
A user's machine gets an IP from ChilliSpot. The user tries to connect to the Internet and gets redirected to the ChilliSpot Captive Portal
If the user supplied the correct username and password, they are allowed on the network.
Normally there are no restrictions, the connection ChilliSpot supplies is either wide open or totally closed. (when not logged in)
We will now configure ChilliSpot in such a way that when a user logs in, a script will run which fetch any defined restrictions for that user from the server running Hotcakes.
You can thus have various ChilliSpot devices which fetch defined user restrictions from a central Hotcakes server.
This script will then modify the IP Tables firewall on the ChilliSpot machine to be in harmony with the specified restrictions defined on the Hotcakes server.

A restriction policy will either deny access to certain hosts and allow access to everything else, or deny access to everything and allow access to a specified list of hosts.
When the user logs off, or their account expires or you forcefully remove them, all the firewall rules for that machine's IP gets cleared. (Again by a script defined in ChilliSpot's configuration file.)
The next user can now log on and the same process will repeat, but using the next user's defined restrictions.
This separates the user from their IP address, making administration a breeze.
2.1.4. Implementation
We will now go through the steps to implement this dynamic firewall.
You will require a working Hotcakes setup. There is a separate HOWTO to get Hotcakes up and running.
2.1.4.1. Modify Hotcakes to include the dynamic firewall extension
Hotcakes Beta-2 has a patch which you have to untar in the existing directory where Hotcakes is installed.
Newer releases will have it included.
| The patches will be named patch-<release>-<date>.tar.gz. You only need to apply the latest patch to a release. It will include the changes of all previous patches (if there are any) for a specified release. |
 | If the installation of Hotcakes you are running contains the 'Profiles->Dynamic Firewall' menu entry you do not need to do this step |
Get the latest patch for Hotcakes Beta-2 from Cakeforge
Copy it to the directory where Hotcakes is served from.
sudo cp /<directory where you downloaded patch>/< patch for Beta-2> /var/www/cakeExtract it therecd /var/www/cake sudo tar -xzvf <patch for Beta-2>Run the sql patch which will add the dynamic firewall table to the radius database.
                cd /var/www/cake/hotcakes/db
                mysql -u root radius < radius_firewall_patch.sql
2.1.4.2. Install the "rules_for_user.pl" script
This script needs to be installed on the machine running Hotcakes. The devices on which ChilliSpot runs will use SSH to run this script. The output of this script will be used by these devices to block or allow destinations for a certain user.
            sudo cp /var/www/cake/hotcakes/webroot/files/rules_for_user.pl /usr/local/bin/
            sudo chmod 755 /usr/local/bin/rules_for_user.pl
Be sure to check the values specified in this script to access the radius database.
            #-------------------------------------
            #---User Defined variables -----------
            #--Please change to suit your setup---
            #-------------------------------------
            my $DataBaseName    =   "radius";
            my $DataBaseHost    =   "127.0.0.1";
            my $DataBaseUser    =   "radius";
            my $DataBasePass    =   "radius";
            #-------------------------------------
As always you are encouraged to change these defaults.
This script uses Perl's DBI and DBD modules to access the database. Ensure the following are installed.
sudo apt-get install libdbi-perl libdbd-mysql-perl
You can now test out this script to see what restrictions user 'alee' has.
/usr/local/bin/rules_for_user.pl alee
| Rules are either all "ACCEPT" or all "DROP". If it is of "ACCEPT" type, a user will be denied access to all except the "ACCEPT" list. If it is of "DROP" type, a user will be allowed access to all except the "DROP" list. |
2.1.4.3. Install the "clear_rules.sh" and "fetch_rules.sh" scripts
These scripts needs to be installed on the machine running ChilliSpot.
In this discussion it is the same as the machine running Hotcakes but this is not a requirement.
            sudo cp /var/www/cake/hotcakes/webroot/files/clear_rules.sh /usr/local/bin/
            sudo cp /var/www/cake/hotcakes/webroot/files/fetch_rules.sh /usr/local/bin/
            sudo chmod 755 /usr/local/bin/clear_rules.sh
            sudo chmod 755 /usr/local/bin/fetch_rules.sh
Be sure to specify the IP of the machine on which Hotcakes is running in "/usr/local/bin/fetch_rules.sh".
            #---------------------------------------
            #---Values to Specify-------------------
            HOTCAKES_IP='127.0.0.1'
            REMOTE_SCRIPT='/usr/local/bin/rules_for_user.pl'
            REMOTE_USER='root'
            #----END Values to Specify--------------
| You are encouraged not to use 'root' as the remote user. Its used here because every machine will have one, but it is not required to be used. |
2.1.4.4. Set SSH up
We will use SSH as a secure means to get the data from the Hotcakes server to the ChilliSpot devices. Ensure you are running an OpenSSH server on the Hotcakes server.
            sudo apt-get install openssh-server
            sudo /etc/init.d/ssh restart
Create a password-less DSA key pair on each ChilliSpot device, and add the 'id_dsa.pub' key to the '/root/.ssh/authorized_keys' file on the Hotcakes server.
Again in this setup the ChilliSpot device and Hotcakes server are on the same machine.
            sudo su
            ssh-keygen -t dsa
            cd /root/.ssh
            cat id_dsa.pub >> authorized_keys
Please note that you must not specify a pass phrase since the ChilliSpot device can not provide one when accessing the Hotcakes server.
You now need to test communication via ssh from the ChilliSpot to the Hotcakes server. (And accept the server's key as a 'known host')
From the ChilliSpot device, issue the following command, and when asked if you should continue, answer 'yes'.
ssh root@<server running hotcakes> /usr/local/bin/rules_for_user.pl alee
| SSH will only ask confirmation on the first access. If you run this command again it will just 'go through' and execute this command remotely. |
2.1.4.5. Modify "/etc/chilli.conf"
Specify to ChilliSpot which scripts must be executed when a user logs in and out. This needs to be done on each ChilliSpot device.
              # TAG: conup
              # Script executed after a user has been authenticated.
              # Executed with the following parameters: <devicename> <ip address>
              # <mask> <user ip address> <user mac address> <filter ID>
              # Normally you do not need to uncomment this tag.
              #conup /etc/chilli.conup
              conup /usr/local/bin/fetch_rules.sh

              # TAG: conup
              # Script executed after a user has disconnected.
              # Executed with the following parameters: <devicename> <ip address>
              # <mask> <user ip address> <user mac address> <filter ID>
              # Normally you do not need to uncomment this tag.
              #conup /etc/chilli.condown
              condown /usr/local/bin/clear_rules.sh
| Remember to restart ChilliSpot after this change! |
2.1.4.6. Explain the "Dynamic Firewall" section in Hotcakes
| The mentioned web pages makes use of the DOM (Document Object Model) and DOES NOT work with Microsoft Internet Explorer. Please make use of Mozilla/Firefox or any W3C compliant browser when using them. |
Hotcakes includes a 'Dynamic Firewall' section under the 'Profiles' menu. It consist of two pages. One is used to view defined rules per profile, the other is used to manage rules per profile.
On both these pages there are a select control from which you select an available profile. If there are Firewall rules defined for the selected profile, it will be displayed. Profiles without any defined rules will show nothing.
A restriction policy will either deny access to certain hosts and allow access to everything else, or deny access to everything and allow access to a specified list of hosts.
Should you want to clear all the defined rules for a profile, you click on the 'Edit or add rules' link. Select the required profile, and click on each rule's 'Remove' link to get rid of it.
When nothing is left, click on the 'Submit' button. This will now clear all the defined rules.
Rules you specify can be a subnet to block/allow in the form '10.0.3.0/24' (This will specify the above Network's DMZ)
2.1.4.7. Handy tips
When you define a rule set which allow only certain hosts, be sure to include the DNS servers in that list.
To see the Dynamic Firewall in action, you can issue the 'iptables -L -n' command. The rules gets added to the 'Forward' chain.